How to Set Up Your Computer for Android Development

I want to develop anroid applications on my computer, where do I begin?
Setting up your development environment for the first time can be quite a pain, but if you follow my guide you'll get it done quickly and easily! In this tutorial, we will:
- Install the Eclipse IDE for Android Development
- Download the Android SDK and Android Developer Tools
- Incorporate Android Functionality into Eclipse
- Create our First Android Application!



Installing the Proper Software
Before we get started setting up our Development Environment, we need to download some software! Run through these steps:
- If you do not already have the Java SDK, go here and install it.
- You will also need the Java Runtime Environment (JRE), which is here.
- Okay, now you need an Integrated Development Environment (IDE). I recommend Eclipse, as it has official support for the Android plugins you will need. I use the Helios version of Eclipse, which is here, but any version should work. Do not download and install the Eclipse IDE until you have the Java SDK and JRE, as Eclipse is a java application itself and needs those to run.
- You will need the Android SDK to actually build Android Applications. Get that here. Install that preferably to the root of your hard drive (C://) in a folder called "Android" for simplicity. After the installation is done, run the SDK Manager and be sure to accept all of the packages for installation.
- You will also need the Android Development Tools (ADT), but we will get to that in a second.
Setting up your Development Environment
Now that you have everything you need, go ahead and install Eclipse. After that is done, make sure Eclipse is installed and running correctly. It's time to add Android Functionality!
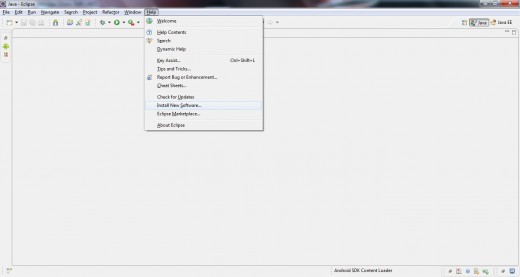
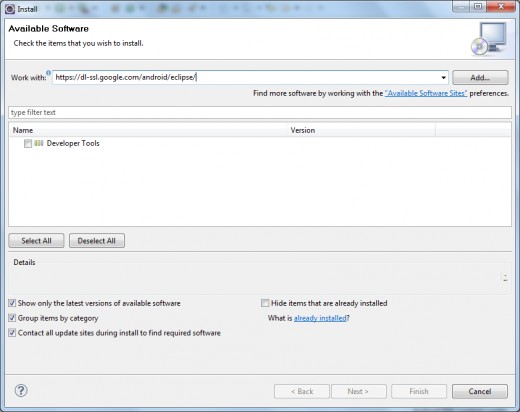
- Run Eclipse, click "Help" in the top toolbar and then "Install New Software", which opens a new window.
- In the text field, paste in "https://dl-ssl.google.com/android/eclipse/" and then hit enter
- A repository named Developer Tools will pop up, check its checkbox and then click "Next"
- A summary of what is to be installed will be displayed, click "Next" again. Make sure to accept all license agreements unless you plan on engaging in illegal activity. Click Finish and your software will be installed in the background! Woo Hoo!
However, we are not done just yet, you need to let Eclipse know where your Android SDK is located that you downloaded and installed just a bit ago.
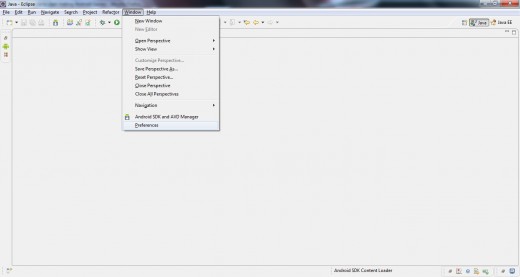
- From Eclipse, Click "Window" and then "Preferences". A new window will pop up.
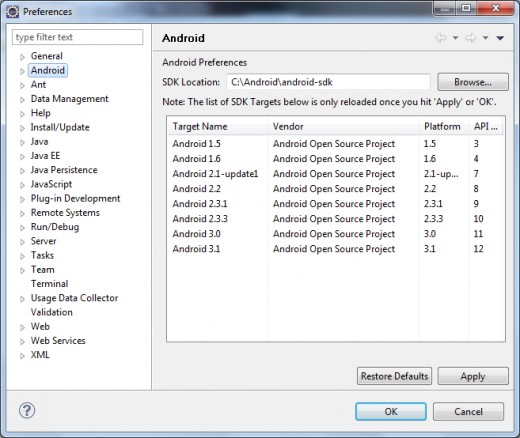
- Click "Android" on the left, you will see a text field called "SDK Location:"
- Click the "Browse" button and navigate to the folder where your SDK was installed and then click "Apply"
- A list of all the SDK Targets should pop up. Make sure you at least have Targets 1.5 through 2.3.3
- If everything looks good, click "OK" and you are ready to begin your first Android Project!
Creating Your First Android Project
Okay, I know that was a lot of work, but it is all going to pay off soon, I promise! Here we go!
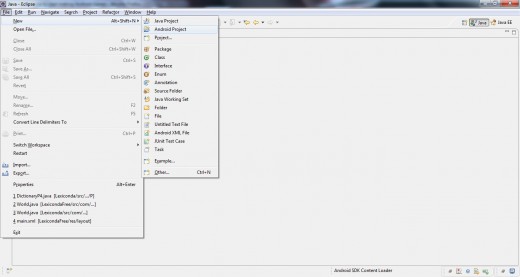
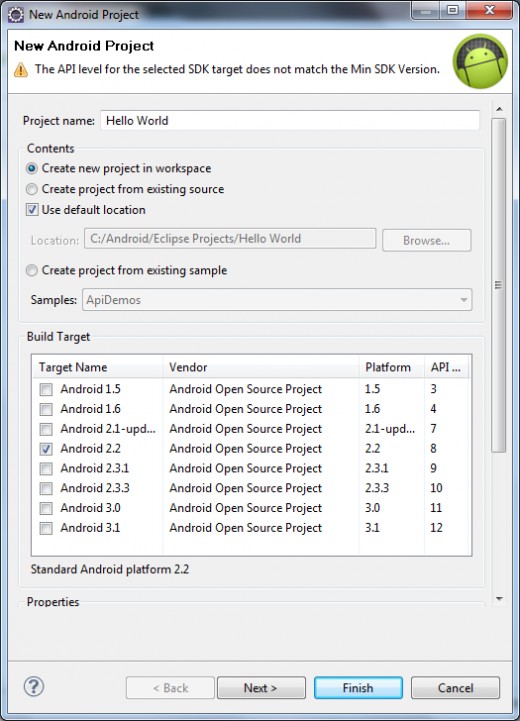
- In Eclipse, click "File" > "New" > "Android Project".
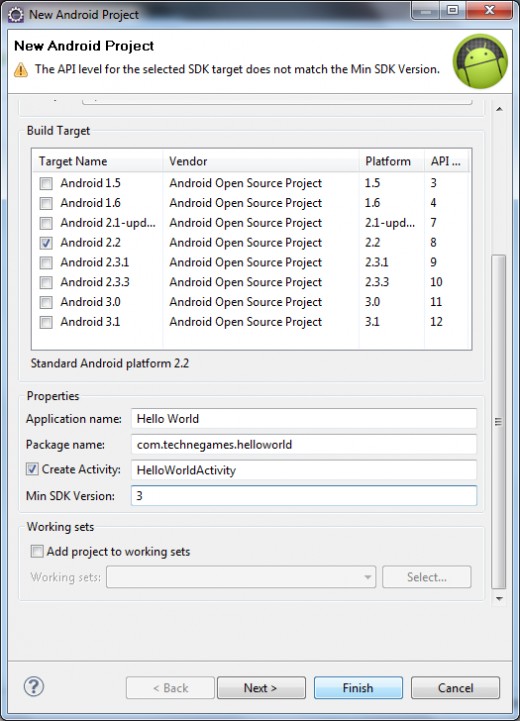
- Give your project a name, for our example project, enter "Hello World". You will also need to specify a target; usually I just click whatever API my phone runs. I have an HTC Inspire, so I check the Android 2.2 checkbox.
- You will also need to have a package name. This basically sets up your folder hierarchy. The normal convention is to use your website backwards followed by the name of your app. For me that would be "com.technegames.helloworld"
- Specify 3 for the Min SDK Version. You will receive a warning telling you that the target and min do not match. This is a silly bug that Google has addressed but will most likely never fix, so don't let it bother you. Click Finish to create your project.
Alright, we have our project set up, let's make it do something!
HelloWorldActivity.java
package com.technegames.helloworld;

import android.app.Activity;
import android.os.Bundle;
import android.widget.TextView;

public class HelloWorldActivity extends Activity{
	TextView tv;
	/** Called when the activity is first created. */
	@Override
	public void onCreate(Bundle savedInstanceState){
		super.onCreate(savedInstanceState);
		tv = new TextView(this);
		String text = getString(R.string.hello);
		tv.setText(text);
		setContentView(tv);
	}
}
Hello World
If you do not have an Android Emulator set up, here is a good guide on how to do that. If you would rather test your applications on your phone:
- If you do not have the Android USB device driver for your phone, you will need to find that (which isn't too hard).
- Make sure that USB Debugging is enabled on your phone by going to the settings screen of your phone and navigating to Applications > Development > USB Debugging.
- Plug in your phone to the computer using the USB cable it came with.
Once you have either A.) an emulator set up or B.) your phone configured correctly and hooked in, you are ready to start coding! Click on your HelloWorldActivity.java, and type in the code on the right, or download the source here!
Once you have the code in your project, run it! You should receive the ouput on the right >>>
Where to go from here
Well, now that you have a working Android Application, play around with it. I don't know about you, but I learn best by trial-and-error. See what works and what does not, and you will learn excellent programming practices!
At this point, I recommend you pick yourself up a book on Android Development. Now that you already have your development environment set up, you will be able to dive into these books and learn code quickly! The four books on the right are perfect for beginners wanting to learn how to develop Android Applications. Purchasing any one of these will set you on the right path!
I've finally gotten around to writing my first Android Tutorial, check it out here!


